Vue has emerged as a ‘new kid in the block’ among JavaScript frameworks for building Single Page Applications (SPA) for the web. Originally inspired by Angular, it has been well received by the web development community, resulting in over 4 million live sites, many of which are high traffic, built with Vue.
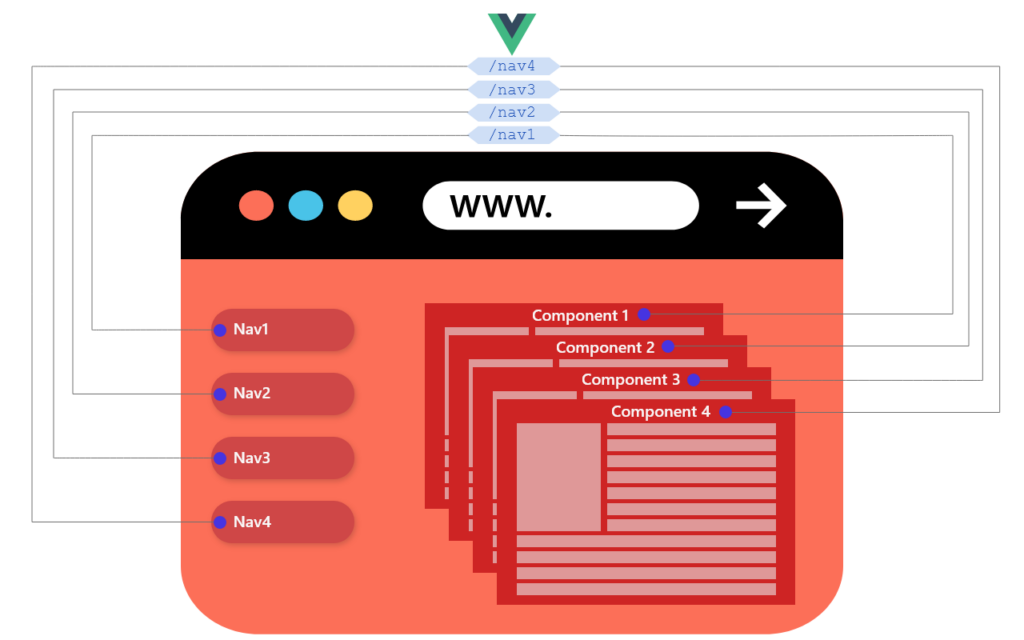
One of the essential aspects of building a SPA is the router. A router manages the on-page navigations to trigger new data fetch that updates the web page’s User Interface (UI). It is the hallmark of all SPAs that ensure a snappy user experience without loading the entire web page repeatedly. To better understand this concept, let’s demystify Vue’s approach to routing in a SPA.
What is Vue Routing?
Being a progressive JavaScript framework, Vue has inherent support for routing. The basic principle of Vue routing involves mapping navigation links to UI components via URL paths.
As the user clicks on one of the navigation links, the routing logic takes charge and loads the corresponding UI component.
Vue’s routing mechanism also supports features for building custom logic, such as:
Dynamic Routing: To map routes to components based on the result of a pattern match rather than fixed route names.
Router Views: Support for a <router-view> component where the component for the current route is automatically rendered when the URL changes.
Programmatic Navigation: Triggering the navigation programmatically instead of clicking on <router-link> components.
Nested Routing: Support for nested routes, which are children of other routes.
Navigation guards: Programmable logic to protect specific routes from being accessed under certain conditions.
Under the Vue framework, vue.js is the main library. However, the router is not included within vue.js by default and has to be installed separately as vue-router package.
Let’s understand the specifics of the Vue Router 4, the current and latest version of the router supported by Vue.
What is Vue Router 4?
Vue Router 4 is the latest version of the official router supported for Vue 3 applications. It was first released in 2020 as part of the Vue ecosystem. It supersedes the earlier version 3 and offers a more lightweight and modular library for implementing client-side routing for SPAs.
Apart from several enhancements in handling the navigation system, Vue Router 4 supports new Vue developer tools for better debugging of routes. It implements consistent encoding in routes across different browsers and route location properties. Vue Router 4 guarantees a quick migration effort with minimal changes while retaining a similar API to the previous versions.
Overall, Vue Router 4 offers a better developer experience with existing tooling supported by browsers and code editors, such as Vite and Devtools. It also provides better integration with newer Vue features, like the <suspence> tag.
Key Features of Vue Router 4
Vue Router 4 brings in a few more navigational features. Most of these features are enhancements over the existing features supported in Vue Router 3, and they offer much more programmatic control over the navigation system.
Dynamic route registration
Vue Router 4 extends the dynamic routing future of the previous version by supporting dynamic route registration. In Vue Router 3, the routes were defined statically at initialization and could not be changed. Vue Router 4 introduces dynamic route registration, allowing programmatic route addition, change, and deletion.
Advanced route matching
Vue Router 4 provides more flexibility in route matching by adopting regular expressions for advanced pattern matching.
Navigation based on global elements
The Vue Router 4 navigation offers seamless interoperability with scroll behavior to match native browser behavior. It also gives users more information about the status of navigation, and you can use that information to improve user experience through global UI elements like progress bars and modals.
Better navigation guards
Vue Router 4 has an improved implementation of navigation guards for handling exceptional situations, such as failure handling and asynchronous guards. Apart from that, it also introduces subtle enhancements like global injections within guards.
A Step-by-step Guide to Using Vue Router 4
Let’s build a basic SPA using Vue 3 to understand the steps in leveraging Vue Router 4.
Follow the steps below to create a new Vue project and add Vue Router functionality.
Note: To perform these steps, you must have a recent stable version of Node.js, like v18.
Step 1 – Create the default Vue project
Open a terminal and run the following command inside an empty directory.
npm init vue@latest
This will prompt you to choose a few options for the new Vue project. Choose all default values, except for the option “Add Vue Router for Single Page Application development?” for which you should choose “Yes.”
Step 2 – Run the default Vue project
Run the following commands in sequence.
cd vue-projectnpm install
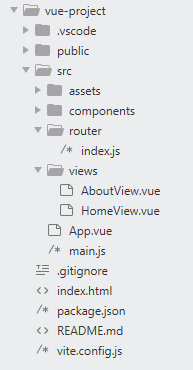
This will install all the dependencies for the Vue project. Ultimately, you will get a project directory structure containing a top-level directory named vue-project.
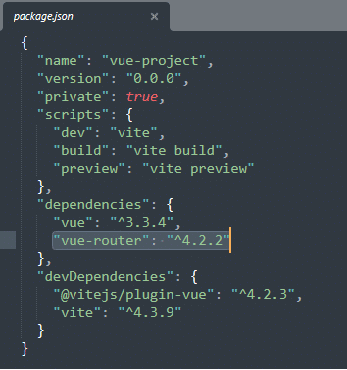
You can check the package.json file to check the dependencies. Note the vue-router version to confirm that you are using Vue Router 4.
Next, run the following command to launch the default Vue app.
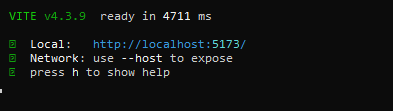
npm run dev
This will launch the development server.
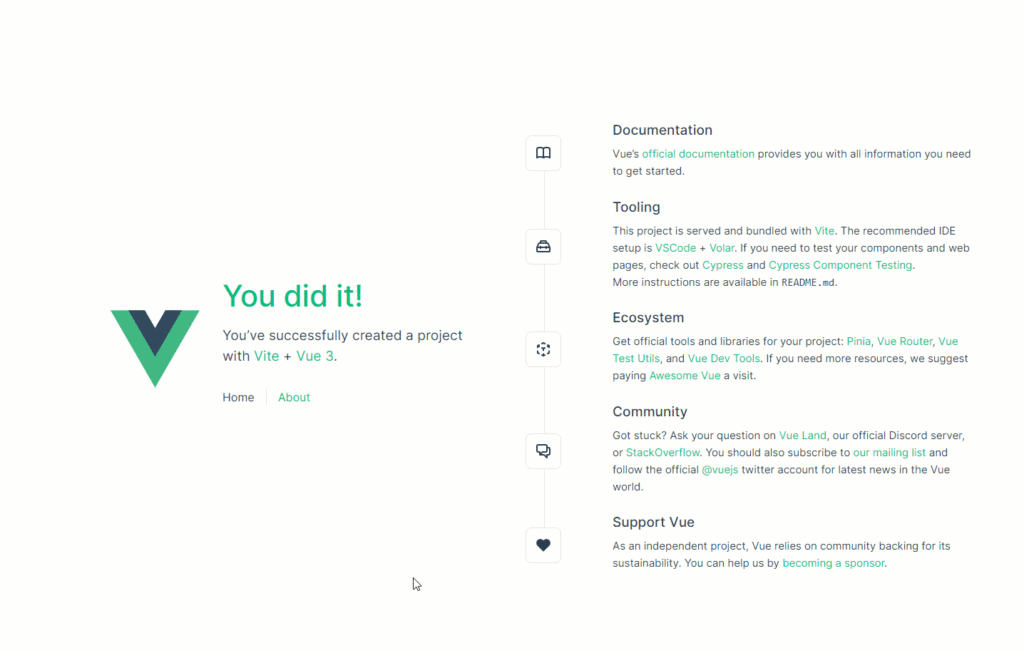
Point your browser to the URL of the development server, and you can see the default web application. Since you enabled the Vue Router, you can also see two navigation elements on the web page for the “Home” and “About” pages, which will display different content.
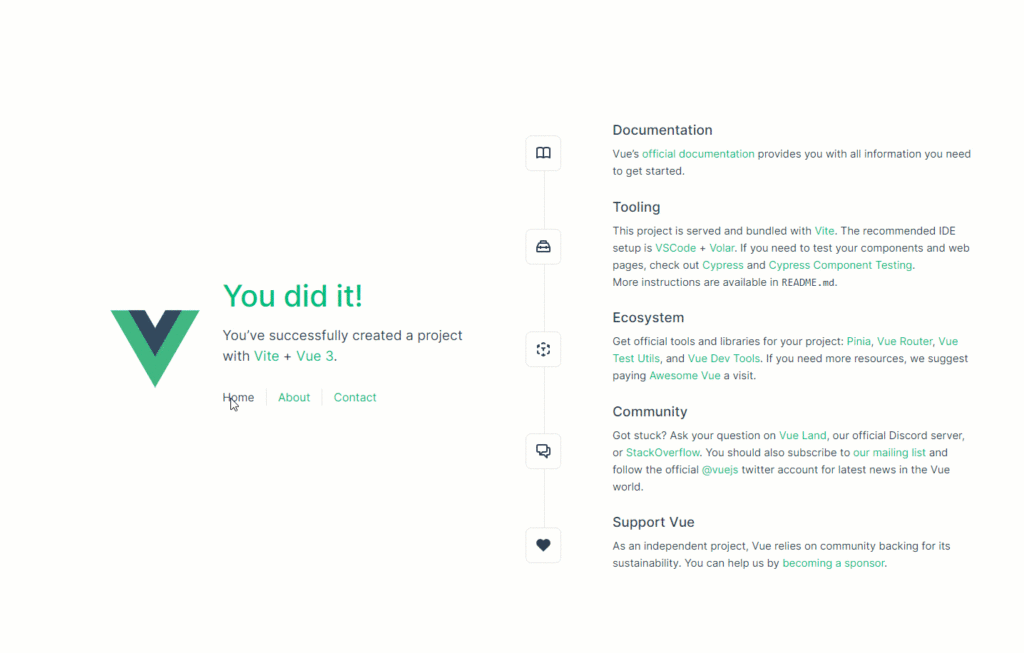
Step 3 – Add a new navigation element
Let’s use the Vue Router 4 to add a new navigation element named “Contact”. To do that, open the file src/App.vue and add the following line within the <nav> tags.
The <RouterLink> is the Vue way of adding a new route target. The two existing targets for “Home” and “About” are already active, as you saw in the default web app. Now you have added a new one.
Step 4 – Update the router
Open the file src/router/index.js and add a new route for the “Contact” nav element as follows.
import { createRouter, createWebHistory } from 'vue-router'
import HomeView from '../views/HomeView.vue'

const router = createRouter({
  history: createWebHistory(import.meta.env.BASE_URL),
  routes: [
    {
      path: '/',
      name: 'home',
      component: HomeView
    },
    {
      path: '/about',
      name: 'about',
      // route level code-splitting
      // this generates a separate chunk (About.[hash].js) for this route
      // which is lazy-loaded when the route is visited.
      component: () => import('../views/AboutView.vue')
    },
    {
      path: '/contact',
      name: 'contact',
      component: () => import('../views/ContactView.vue')
    }
  ]
})

export default router
This will create a new route named “contact” with the path set to “/contact” and a component named ContactView.
Step 5 – Create the new component for the new route
In the previous step, you defined the new route with a component named ContactView. Let’s create this component by pasting the following code into a new file:
This file defines an HTML template that displays an H1 element stating that this is a contact page.
Save this file as ContactView.vue under src/views subdirectory.
Step 6 – Test the new route
Assuming that the npm run dev is still running in the terminal, the Vue project should get automatically rebuilt along with the file modification done in the above steps.
Reload the web application in the browser, and now you can see the new nav element “Contact” which routes to the new ContactView component page.
Voila! You have successfully used the Vue Router 4 to add a new route to the default Vue SPA.
Level up Your Vue SPA to Avoid Security Issues
Vue Router is a powerful library for building single-page applications (SPAs) with Vue.js. However, like any other library, it must be used correctly to avoid potential security issues. Here are a few caveats to look out for in Vue Router implementation:
Unprotected Routes: Unprotected routes lead to unauthorized access to protected routes without authentication and authorization checks as part of route navigation guards.
Open Redirects: Vue applications can be subjected to redirect attacks if programmatic routing options such as router.push or router.replace methods are not used correctly. This results in an attacker being able to control the destination of a redirect.
Exposure of Sensitive Information: Passing sensitive information (like tokens or user IDs) as route parameters or query parameters can lead to security vulnerabilities through browser history, logs, or the Referer header.
To mitigate these issues, it is imperative to always validate and sanitize user input, implement proper authentication and authorization checks, avoid exposing sensitive information in URLs, and use a strong content security policy.
To make tracking such security issues in the source code easier, developers can leverage the Spectral platform to run security scans for live monitoring of the entire project codebase to unearth security threats.
Get started with a free Spectral account today and learn how it can help protect your source code from such unforeseen security threats while protecting your company from expensive mistakes.
Rapid and constantly-evolving software development cycles have increased the need for reliable and fast infrastructure changes. Thus manually carrying out infrastructure changes has become an unscalable
What if the very core of your company—the digital ecosystem you painstakingly built—is under attack? If an invisible enemy gets illegal access and begins manipulating data
Your IT infrastructure is a complicated network of systems and activities that generate massive volumes of data every second. Hidden within this data stream is the