Top 9 Vendor Risk Management Software for Infosec Pros in 2023
No single organization can master all trades, which is why their success hinges heavily on their vendors. And if vendors are crucial for your business operations,
DevOps is an evolving practice. New tools, methodologies and approaches are explored to meet the needs of businesses and developers. When it comes to orchestrating development and achieving continuous integration, one of the more popular solutions out there is offered by no other than Microsoft. Azure DevOps Server offers a broad range of features and capabilities for developer operations at a varying cost.
In this post, we’ll review what TFS/Azure DevOps Server is, how to get started with it, and how to set up repos and pipelines.

Azure DevOps Server, previously known as TFS, or Team Foundation Server, is an integrated code pipeline that lets you share, track, and ship software in a team environment.
TFS is Microsoft’s solution for continuous DevOps and has since been rebranded/renamed Azure DevOps Server. It has an in-built suite of tools that lets you achieve continuous integration and delivery with ease.
It includes the following features:
Before you begin using TFS, or Azure DevOps Server, you’ll need to set it up. So let’s get started.
Head over to dev.azure.com and click on the `Start free` button. If you don’t already have a Microsoft account, you’ll need to set one up. Once completed, you will see the following popup. Select Continue.

After you’ve pressed Continue, you will be directed to a waiting screen. Microsoft Azure server is setting up your TFS server for you.
Under the old version (which is no longer supported), it will involve a lot of heavy lifting and server configurations. However, under the new and rebranded version of TFS under Azure DevOps, all of this is done for you through an automated process.

Once the server setup is completed, you will be given a prompt to name your project. The default visibility setting is Private. You can change this at any time after your TFS Azure DevOps server is created.
Click on Create project once you’re done naming your project.

Once you’ve created your project, you will be directed to the dashboard. This console is your overview space and contains access to all your boards, repos, pipelines, test plans, and artifacts.

When you start, your project will not have any repositories attached to it. There are two ways to connect your TFS/Azure DevOps Server project to code repositories. The first is via the command line. The second is to manually import your repository as a zip file.
Let’s walk through adding an existing repository to TFS/Azure DevOps Server via the command line.
Before you can push an existing repository to your new TFS/Azure DevOps Server, you’ll need to change the origin. What this does is reroute your current repo to push to your project server rather than where you originally hosted your code (for example, on GitHub).
Note that git is a version control tool and GitHub is a code hosting service. When you change to TFS/Azure DevOps Server, you are changing your hosting service and not the version control tool. You’ll still continue to use git as your version control tool, even after migrating over to TFS/Azure DevOps Server.
To add a new git origin, the command takes two arguments: the remote name and the remote URL.
To find your remote URL for TFS/Azure DevOps Server, click on the Repos option. This will direct you to a screen where you can copy a remote server origin URL.
The structure of adding a new remote origin looks something like this:
git remote add <remote name here> <remote URL here>
To verify your remote, use the following command:
git remote -v
This will give you an output of all your connected endpoints. In the output below, I named my remote endpoint TFS_Azure and it will push to my TFS project. The URL is an example only and will show the URL you used.
TFS_Azure    https://[email protected]/example/xxx(fetch)
TFS_Azure    https://[email protected]/example/xxx (push)
Once done, you can push it to your TFS/Azure DevOps Repo by using the remote name you used.
For example, based on the example above, the command would look something like this:
Git push -u TFS_Azure --all
When pushing for the first time, an authentication popup or command prompt will appear. You just need to log in as per usual.

Once you’ve logged in, your command line will set up the various branches for your repo and push it up to your new repo. After this is done, if you navigate back to your Repo tab, you will get a copy of your code repo in TFS/Azure DevOps.
From here, you can set up a build process for your pipeline. To do this, click on the Set up build button located at the top of your repo.

Once you have an attached repo, you can add it to a pipeline. A pipeline is a preconfigured set of steps that determine the build and deployment process every time there is an update on your code. This is an automated process and can save time on deployment.
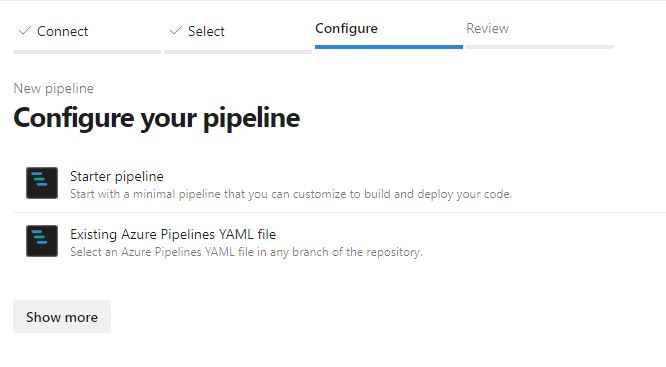
If you click on Show more, it will expand a series of options that will let you build your code based on your preferred methodology.

Your pipeline is configured through a YAML file. Instructions on how to structure the YAML file for pipelines can be found at https://aka.ms/yaml
Once that is completed, click on save and run.
This will automatically boot up your first build.

If you click on the Job tab, it will give you a live console rundown of what’s currently happening.

Once your build is completed, the blue process bubble will turn into a green tick.

Congratulations! You’ve now completed your first build. However, a build by itself is not very useful until it is deployed. To do this, you need to set up your environment.
Head over to the Environments section and you’ll be greeted with a page that looks something like this.

Click on the blue Create environment button. This will give you a side popup where you can set up your new environment.

Once you fill in the Name and Description section, you can create your environment. If you already know what kind of environment you want, you can select it now. Otherwise, you can attach it later.
Then, you will be directed to a screen that looks something like this:
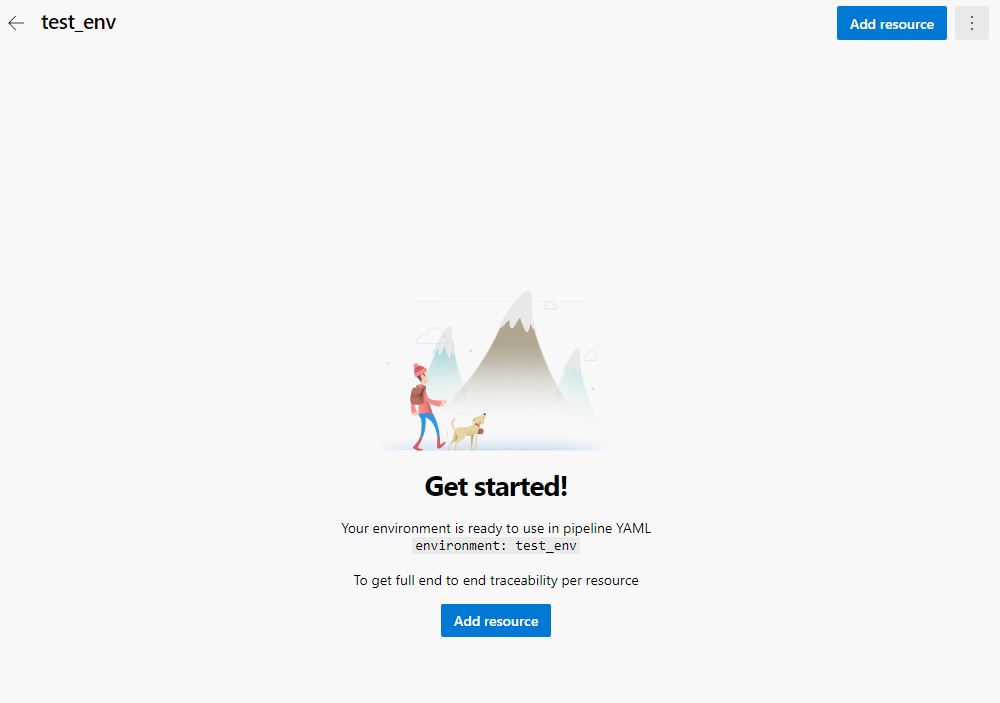
If you didn’t choose a resource in the previous screen, you can add it here by clicking on Add resource.
Depending on what you choose, you might need to either set up a Kubernetes cluster and link it in or set up a virtual PC. Then, you can create a release pipeline by clicking on Releases on the sidebar panel.
This will navigate you to the new release pipeline process:

To add a source of your build, select the Add an artifact bubble. This will bring a popup where you can select the source of your artifact. In our case, it’s the build that we’ve previously set up.

Once you’ve clicked Add, the pipeline will change to reflect the attached artifact.

The next step is to add a stage. Different development cycles have different stages for release. In our case, we are going to make a User Acceptance Test stage, which is where we can deploy our prototypes and preapproved builds before it hits production.
A list of templates will be presented. Select the one that applies to your project and it will run you through the setup process for it. In the final step, it will ask you to set a name for the stage.

Once completed, click on the X in the corner. This will take you back to your pipeline area.
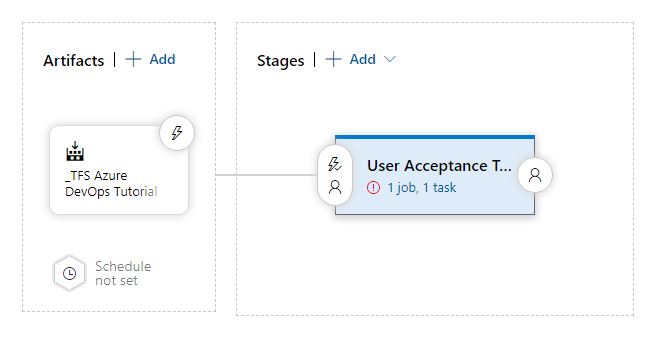
If you click on the 1 job, 1 task link, it will take you to the pipeline tasks set up.

Fill in the necessary information. Once done, click on the save button at the top. This will give you the option to create a release.

After you click on create a release, there will be a side popup where you can set the triggers for release. In our case, it will be when there’s a new build, which is triggered by a code change.

When you’ve hit the Create button and everything goes as planned, you will get a success message with your release name.

If you look at your release log, your recently created release will appear there with a status on how it went.
Once that’s done, all that’s left is to set up a deployment group where your release is going to be deployed. To do this, navigate to Deployment Groups and click on Add a deployment group.
Give your deployment group a name and a description. Once completed, click on the Create button. This will give you a command script for you to run in your deployment target machine. Once completed, everything will be hooked up and ready to go for automated DevOps with TFS.

No single organization can master all trades, which is why their success hinges heavily on their vendors. And if vendors are crucial for your business operations,

Integration is an indispensable aspect of modern software development. As software applications become more complex and interconnected, every component must work seamlessly together like a game

Modern companies are rapidly adopting cloud applications and services due to scalability, cost savings, and faster time to market. DevOps teams and developers must deliver fast,